Sunday, October 10, 2010

Done! Done! Done!

I can't believe it's done! It took twice as long (60 days) and cost twice as much (don't ask) as I thought and the results aren't that bad. Everything went wrong with this project,It had way more rust than I thought,I got a chunk of metal in my eye,My air compressor had a massive meltdown which necessitated a hasty trip to sears to procure a replacement. The biggest problem was most autobody supply stores are closed on weekends which was when I did most of the work,So if I ran out of anything I was screwed.Auto parts stores carry a limited selection body supplies.The final night of painting culminated in a 17 hour thrash.
It took me a day to put everything back together,The drivers side door received a new handle and inside latch since the originals were wasted.The front side marker light lenses are NOS chrysler (I was to lazy to clean up the originals). Installation of the windshield was the one task I hired out.The wheels are 15x8 Cragar soft 8 with Nexan 31x10.5x15 tires,these were the one splurge I made on the project. In my lifetime I've owned five Dodge trucks with this body style and they were all huge piles of crap,I'm glad I finally have one thats nice.Theres still a laundry list of small things to take care of,But I think I'm just gonna drive it and be happy.

1976 Dodge Powerwagon

Friday, September 17, 2010

The Box is painted


  I spent much of Friday morning wet sanding the box with 400 grit. It probably needed to be block sanded one more time,It was as straight as it was going to get. I spent much of the afternoon cleaning the garage. Having a clean shop is always an added bonus to painting a vehicle.I now have the entire weekend to work on the doors which are kinda rotten.The goal is to paint the cab next weekend and be done. I can't wait.

Tuesday, September 14, 2010

How to apply factory decals

I wanted to add a custom touch to the powerwagon rebuild. I always liked the mopar musclecars with the blacked out hoods like the A12 roadrunners and superbees. I had some leftover Dupont Chroma base black from a previous project,So I used it to paint a spare truck hood I had laying around and bought some 440 decals from Phoenix Graphics. These were originally used on a 1970 Charger.
The first step of course is clean the hood.Even though the hood was painted two days ago it was already covered in sanding dust. I used PPG DX330 wax and grease remover to clean the area of application.
Application gel is used to temporarily deaden the adhesive so the decal can be moved.
The low-tech alternative is soapy water,It'll do the same thing

After glopping on some application gel I pulled the wax backing from the decal exposing the adhesive.After some careful measuring I laid down the decal.....no turning back now.
Using the supplied squeegee I started to work  the gel toward the edges and trying to get out all the air bubbles.
After working out the bubbles I waited an hour to remove the premask decal.It's best to pull gently at an angle.There was still some air bubbles that I worked out with the squeegee.
There ya go! '70 charger decals on a '76 dodge powerwagon.


Monday, September 13, 2010

Progress?

With the fender jambs painted I tore off the front clip in record time.I have a new bumper so the one in this photo is on its way to the scrap yard
I fought the aftermarket (made in china) fender getting it to fit right,I ended up taking out all the shims and giving it a few "love taps" with the rubber mallet.I also installed the hood with some help from Tucker.
The Box is close to being ready for paint. After spraying several coats of primer/surfacer and block sanding with 220 grit sandpaper on a longboard It's actually straight (sorta).

Sunday, September 12, 2010

Finally! Paint begins to flow and parts show up

I painted the jambs on the front fenders the factory Silver Cloud metallic.
Yes,this is the color the truck is supposed to be.
I'm trying something different with the hood. I'm painting it black like the blacked out hoods of the 60's musclecars.Later I'm adding 440 decals from a 70 charger. It might look hokey or it might not.I've had this idea marinating in my brain for some time and I'm glad to finally see it come to fruition
Friday afternoon I got my new windshield gaskets and door fuzzies from the Dodgeconnection.com
I pulled the windshield today and was pleasantly surprised to find no rust....shocking.

Friday, September 10, 2010

I love Ebay


I scored this NOS (new old stock) three-speed wiper switch for the Fury on Ebay. Ebay and the internet is pretty much my only outlet to procure parts these days. As most auto parts chains phase out experienced ASE certified parts guys and replace them with semi-literate high school dropouts,I've given up on most of the local parts stores. I can only imagine the befuddled look the guy behind the counter would give me when I try to explain what I need. I'm really groovin on the old-school chrysler parts box,It might make good garage art.

Thursday, September 2, 2010

Well that didn't work out as planned

Ummmm yeah,Maybe my 30 day body rehab plan on the powerwagon was a little ambitious. It seemed like everything was working against me,weather,work,late parts,more rust than I thought,I even ended up with a chunk of metal in my eye that delayed things even more. As of now all the front sheetmetal is in primer. both rocker panels are installed and only need some finish filler. So it's not like I didn't accomplish anything.
 I now have a four-day weekend coming up and hopefully I can spend most of it in the garage working on the truck. I kinda have to finish it at this point because I'm way past the point of no return.

Tuesday, August 17, 2010

Zero to Hero in 30 Days? Day 17: Enter Sandman


Last week was kind of a bummer,The rain and brutal heat kept progress to a minimum. The weather may have put the 30 day goal in jeopardy. If it wasn't the weather it's the rust, I knew this thing was a rust bucket but I had no idea it was this bad. What I didn't cut out and weld in with new metal I sandblasted,The entire box is covered in nasty scaley rust. Oh how I loathe sandblasting.I've been digging sand out of every orifice of my body for two days. But With most of the rust removed from the box I began priming with Dupont Variprime which is a self-etching primer, I like spraying Dupont because the mixing ratios are easy to figure out (variprime is 1:1) Some of the PPG stuff have goofy ratios that require a math degree to figure out.

Sunday, August 15, 2010

Zero to hero in 30 days? day 15


This rocker panel made me cringe. Whoever did the bodywork previously applied bondo over duct tape and stuffed the rockers with grocery bags. The only option for fixing this trainwreck is to cut everything out and weld in new.
I used a cutoff wheel to remove the rusty rocker panel......good riddance
After I got the rocker off I applied POR 15 to the inner structure. Since this thing has such a rust problem I figured I should do everything possible to prevent further rust.
This rocker panel was a reproduction and not an OEM,so there was some fitment  issues. I've seen worse repro rocker panels and I've seen better. After some trimming I welded the panel in place, I plug welded the rocker along the pinch weld like it was done in the factory. I still need to finish some filler work and get it ready for painting. Now I have to do the same thing on the other side.

Friday, August 6, 2010

Zero to Hero in 30 days? Day 6 Rust never sleeps

It's been a long week,juggling work,insane weather and a crazy self-imposed deadline on a truck that is worse than I thought. Everything was going fine until I pulled off the side trim,Underneath was several nasty rust holes. Then my welder started working like poo,It turned out the 10 pound spool of wire I bought was too heavy for my welder,so I had to run to the welding store and get a two pound spool which worked much better.I ordered a new right front fender and rocker panels for both sides,They are supposed to be here wednesday,So I want to have the box in primer before the parts get here. I only have two more patch panels to weld on the box before I'm done. So I guess I'm on schedule.....as long as I don't find anymore rust.

Sunday, August 1, 2010

Zero to Hero in 30 days?

 Laugh all you want but this is my dream truck. I paid $1000 for the "privilege" of owning this heap. Once I saw it I had to have it,a genuine 440 under the hood fulltime four-wheel drive  a 727 auto with 3.23 gears. My lust over the mechanicals made me overlook the questionable bodywork.Once I got it home I took stock of the situation and I realized what a huge pile of crap it was. It's now been almost a year since I purchased this beauty of a 1976 Dodge Powerwagon and I've endured plenty,shortly after I took possession of It I noticed the floors were horribly rotted and I thrashed hard to have it ready for what turned out to be one of the worst winters in many years. It actually ran well all winter,It was never garaged and the big 440 started every morning. The only mechanical malfunction was a fragged front driveshaft (a common failure especially with fulltime four-wheel-drive). Everything was going great until March 14 of this year when some nitwit pulled out in front of me.Everyone walked away uninjured but my beloved Powerwagon which wasn't much of a head-turner to begin with took another aesthetic setback. The insurance company declared the vehicle a total loss (no surprise there) after some negotiations I walked away with $950 and still retained ownership.After haggling with the insurance adjuster I was scrambling to find parts. I located a 73 truck for $500 and a 75 for $50 and in another epic thrash I managed to make one truck out of three(some must die so others may live haha).The photo at the beginning is the result of all my work,Not exactly overwhelming, In fact It's a bit disconcerting to have worked on something so hard and have it be so ugly. So I've given myself 30 days to get this thing painted. In the third act the hero always makes a comeback and thats what will happen. Why 30 days? Because I'm a born procrastinator and setting a firm timetable works good to keep my head in the game.Call it Overhaulin: White trash edition. Will I succeed? Or will the powerwagon simply implode into a pile of greasy parts? So cross your fingers and check back often for all the bloody knuckled updates.

Thursday, July 15, 2010

8 3/4 rebuild part IV


I finally got around to bending the new brake lines on the junkyard 8 3/4 rearend. I also installed new wheel cylinders. bending hardline can be a little nerve racking,One screwup and you have to redo the whole thing.
Now I'm waiting on brake shoes and assorted hardware and I have to get the drums turned before I'm done

Friday, July 9, 2010

Confessions of a junk car addict.


I came to a realization lately that people think It's weird I drive old junk cars.To put things in perspective Gerald Ford was president when my '76 Dodge Powerwagon was built.It's not that I can't afford a new car,I just don't want one I leased a '02 and '04 Ford Ranger. I've started calling that five year period "The dark ages" I felt weird about it the entire time,It was nice driving something where everything works (a problem I haven't had since) But it wasn't me.I guess I would describe myself as a non-conformist,And driving the Rangers made me feel like a member of the herd.Once my lease was over I purchased a 1977 Ford F-150 and I immediately felt revitalized,Theres just something about being surrounded by vintage sheet metal and having a V-8 taking commands from my right foot that feels right. I enjoy the challenge of keeping a vehicle on the road that should've been crushed years ago.When I drove the new stuff I felt like some of my auto repair skills eroded from lack of use.It came back in time of course,but I remember standing over a Holley carb knowing what was wrong with it but not remembering how to fix it.I'll even admit the new stuff is way better,fuel injection is way more efficient than any carburetor and engines today can go 100,000 miles before a tune up. I currently own five cars and have enacted a zero population growth edict on myself. Which means I can't buy another car without getting rid of one. This rule can be hard to abide since I'm known as the "Old car guy" and I'm often tipped off to some killer deals that are hard to pass up. A lot of people look at me with pity when they see what I drive,Women have refused to date me based on what I drive. I'm OK with that,sometimes the pity and disgust goes both ways. I have to drive to the grocery store now......I hope my truck starts.

Tuesday, June 15, 2010

Chrysler 400 big block spray can rebuild

This is the 400 before I yanked it out of a 1975 dodge truck. as you can see it's pretty crusty and greasy. It's factory rated at 185 HP which really sucks so the scheme is to clean it up and try to squeeze some more power out of it and hope it doesn't blow up.

After I got it on the stand I pulled everything I wasn't gonna use,like the factory two barrel intake,truck oil pan,exhaust manifolds etc. and started scrubbing and scrubbing for what seemed like forever!
This thing still had the factory timing chain! It was pretty loose and the plastic teeth were cracked so it wasn't gonna last for long. I replaced it with a double roller timing chain from Mancini Racing. At this point I was really tempted to swap cams for more power.But in the end I decided to leave in the stock cam for smooth idling and trouble free cruising whenever this engine makes it back into a car.
I'm planning on installing this engine in my '73 Fury so I had to change oil pans. while I had the oil pan off I checked the bearings and added a windage tray from Milodon. I also changed oil pumps.

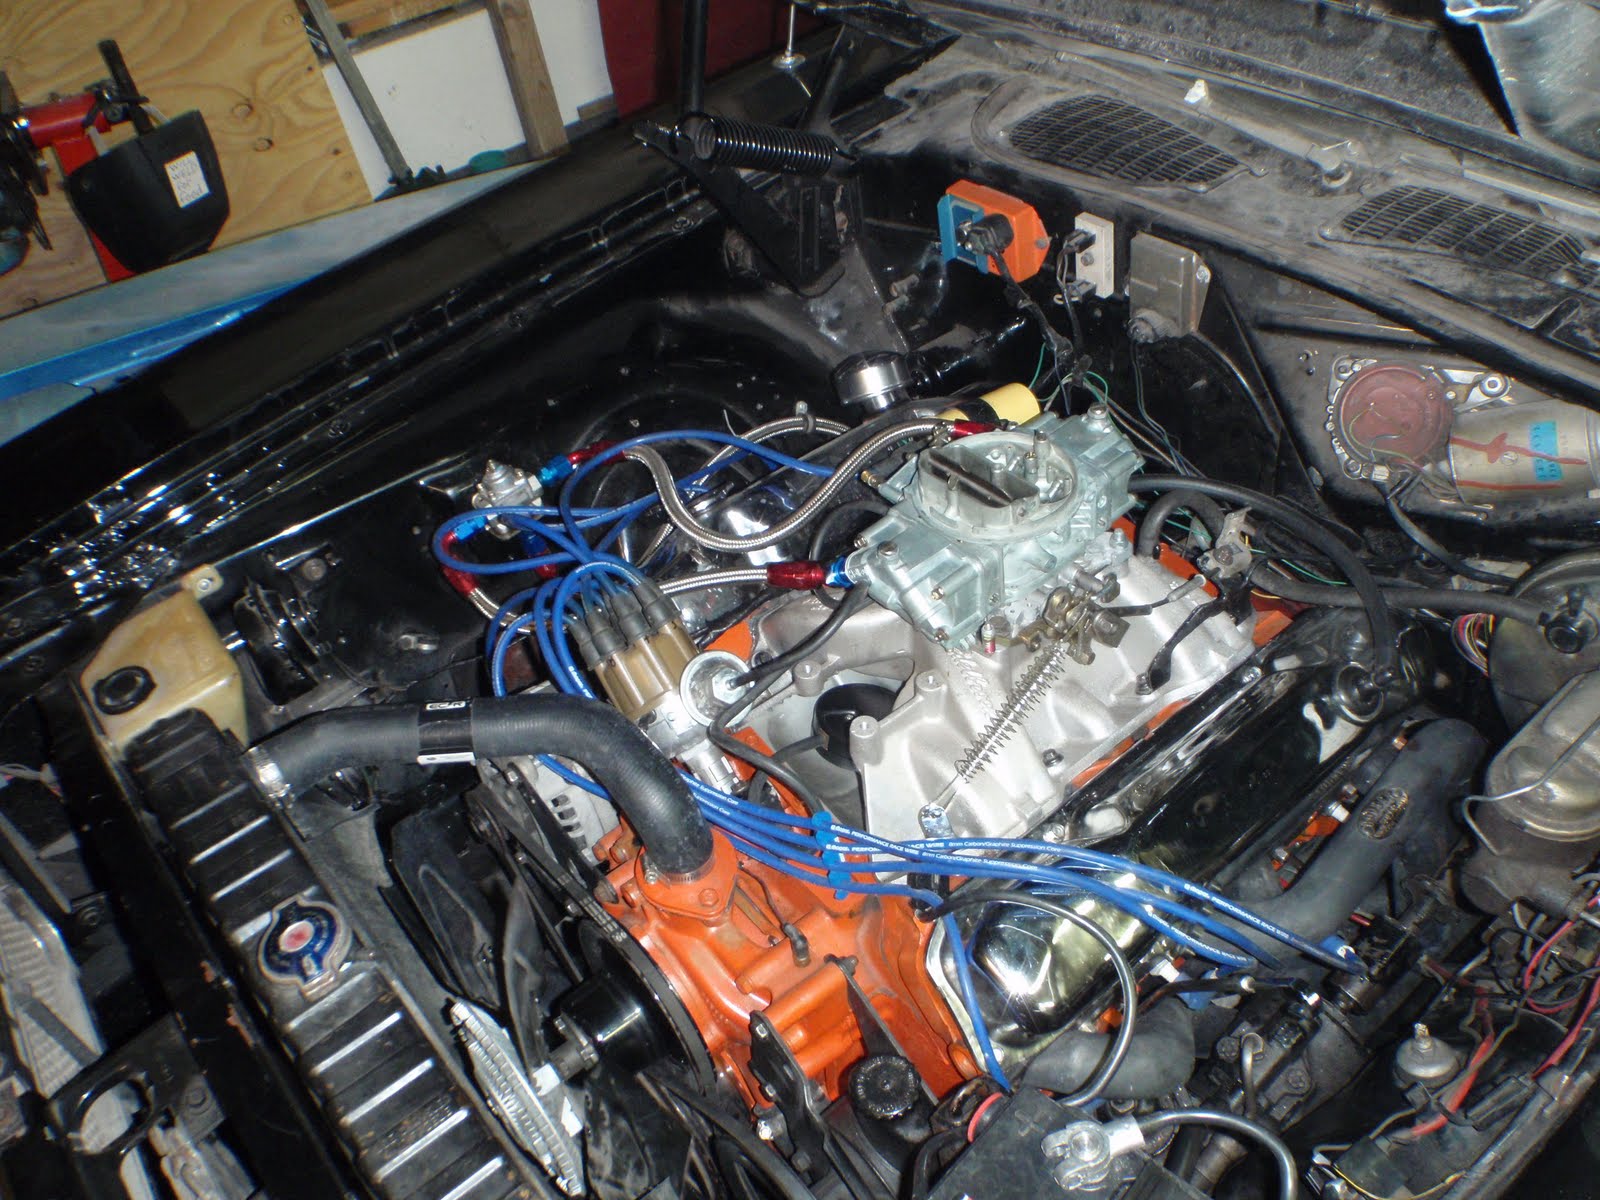
Finally after all the cleaning paint begins to flow! It's best to spray several light coats instead of one heavy coat.I used Depli-Color Chrysler Blue spray paint,It's a close match and a bunch cheaper than ordering it from Chrysler.
The Intake manifold is a Mopar Performance M-1 dual plane fogged engine color. The exhaust manifolds are 1970 HP which flow a little better than the 1975 units.The vintage Cal Custom valve covers are probably too "Hollywood" for the Fury so I'll probably end up using some cleaned up stockers.I still need to scrounge up the proper pulleys and brackets,But next time you see this engine It'll be between the fenders of the Fury.

Monday, June 7, 2010

8 3/4 rearend rebuild Part III

After a long delay due to some costly home improvement projects, I finally returned to the garage to thrash on the junkyard Chrysler 8 3/4 rearend. After laying a bead of RTV on the housing I dropped the Third member into the housing with a gasket and torqued the bolts to 45 ft lbs.

You need to be careful sliding the axles in. The splines can cut the axle seals and cause a leak.
The passenger side axle has an endplay adjuster.refer to the factory service manual for the correct procedure to adjust endplay
This little bugger is the endplay retaining clip. Do not lose these things because nobody makes them anymore.
This is the finished product. I still need to install the pinion snubber and brakes. And since the original brake lines were trashed I'll be bending new hardline when I get time.

Sunday, May 9, 2010

1973 dodge dart carb install

I don't own this car,I often whore out my automotive talents and work on other peoples cars. This is a 1973 Dodge Dart Swinger owned by Ryan Tucker It has a 318 with a 904 tranny and 4.10:1 cogs in a 8 1/4 rearend.It also has front disc brakes and large bolt pattern Rally wheels. Did I mention It was a California car with very little rust? A huge change from the rusted out hulks that usually grace the driveway.
To continue the persistant carburburetor theme on this blog we spent a day swapping out the old crusty 600 cfm Holley (left) for the shiney new 570 cfm Holley street avenger
When test fitting the carb we noticed the throttle blades caught on the manifold. So a carb spacer was needed
We ended up using this old Mr. Gasket carb adapter on an even more ancient Weiand intake manifold.The throttle linkage was really hacked together by the previous owner which caused a ton of grief.


The new carb ran nicely,The stock jets were #54 which were waay lean I went up to a #64 (the smallest I had) to fatten up the fuel curve.besides the weiand intake the 318 also has an aftermarket cam with unknown specs.The headers flow into a pair of glasspacks. This little car moves pretty good for what it is. It still needs the electric choke hooked up and maybe some additional tuning, But the owner is happy with the performance so I'm happy.

Tuesday, May 4, 2010

                                  
     I started getting the Holley 850 cfm double pumper ready for the challenger,I did a quickie cleanup and added a chrysler throttle lever extention  HolleyP/N 510-20-7
I also had to change the power valve from the stock 6.5  to 3.5. The method to determine the correct power valve is to take a vacuum reading and divide it in half. I had a vacuum reading of 7 inches which gave me 3.5. here I am getting "intimate" with the power valve to make sure it works.
 Heres the 850 installed and ready for action! next on the to do list is to get the slicks mounted and install the long lug studs on the axles.

Thursday, April 29, 2010

8 3/4 rebuild Part II

I pounded in the axle seals P/N 8695S with some RTV
These are the 11inch drum brakes I'm using....These have been on the shelf for a long
time I'm glad they're finally being used.
The 3.23 Third member was pretty sludgy I'm gonna clean it up with mineral spirits,cross my fingers and bolt it in

Tuesday, April 27, 2010

8 3/4 rebuild Part 1

 
Top to bottom: Housing gasket,axle seals,metal flange gasket and outer foam gasket
My original plan was to use the aftermarket "Green"axle bearings but since the factory timkens were in fine shape I decided to keep them. I packed the bearings with high temp grease using a needle tip on a grease gun.
I cleaned up all the threads on the housing and cleaned the gasket surfaces
I thoroughly cleaned the housing and coated it with POR 15.....Wear gloves with this stuff because once it gets on your hands it doesn't come off.
I scored this C-Body 8 3/4 housing in a junkyard. A common theme in my projects
The 9 1/4 rearend was introduced for the 1973 model year. It's an extremely durable unit and was used by Chrysler until the late 90's . The only problem is there isn't much to be had for aftermarket gears and posi units. Which is why I'm switching to a 8 3/4 with a used 3.23:1 "sure grip.